Do you want to know about WordPress Staging Site? Discover the top 5 hosting providers for WordPress staging sites in 2024. Explore plugins and create a secure testing environment.
A WordPress staging site serves as a trial site for the safe implementation of extension updates and other modifications before going live.
In this comprehensive guide, we will demonstrate the simple process of setting up a staging environment for your WordPress site. Multiple methods will be covered, and most can be accomplished with just a few clicks.
What is a WordPress Staging Site?
A staging site is a replica of your live website used to test changes before implementing them on the live site. It helps identify errors, preventing potential disruptions to the live site.
In the past, establishing a WordPress staging site was quite complicated. However, the process has now become simpler, enabling even non-technical individuals to accomplish it.
Many users install WordPress on their Windows or Mac local server for testing. After making the necessary updates, they can easily transfer these changes from localhost to live server
This approach presents a major problem: what if something that works on your localhost does not work on the live server?
Often, local sites and live WordPress hosting servers do not operate in the same environment.
By establishing the staging site on your web hosting server, you can easily avoid these errors as it runs the same server configuration as your live site.
With that being said, let’s explore how to configure a staging site for WordPress.
Creating a WordPress Staging Site with the Top 5 Hosting Providers
There are several methods available to create a staging site for WordPress. The simplest option is to utilize your hosting provider’s pre-installed staging site feature.
Some of the top WordPress hosting companies already offer 1-click staging sites. If your website is hosted with one of them, you can effortlessly create a staging site without any complications.
If your hosting provider does not offer this feature, there are alternative solutions available to help you create a WordPress staging site using a plugin, or even by manual setup.
Create A Staging Site on Bluehost
Bluehost is among the top WordPress hosting providers. Their plans include a convenient 1-click staging site solution.
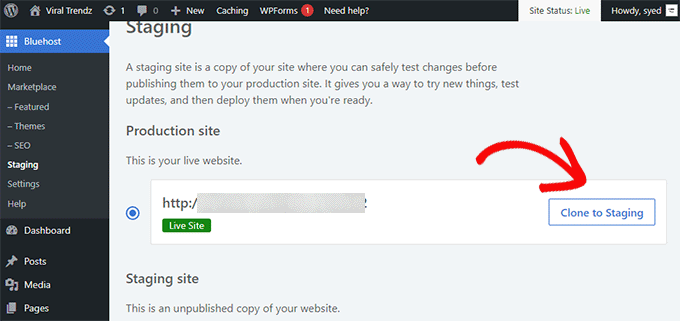
Initially, log in to your WordPress site’s admin area and navigate to the Bluehost » Staging page.
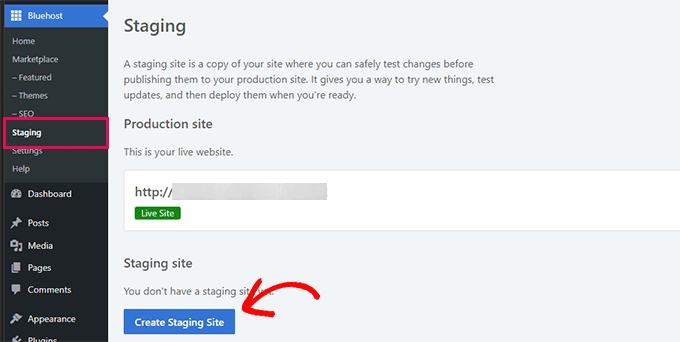
This will redirect you to Bluehost’s staging site wizard. Next, click on the ‘Create Staging Site‘ button to proceed.
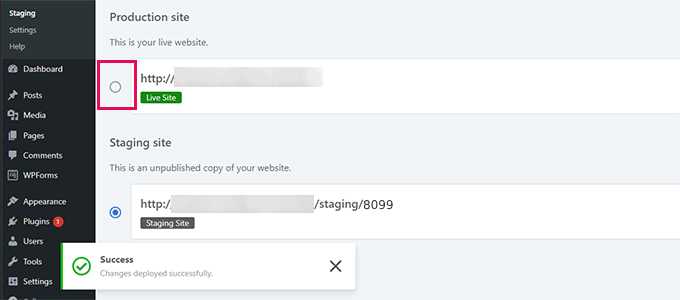
Bluehost will then prepare the staging environment for your website. Once completed, you will receive a success notification and an option to switch between the production and staging sites.
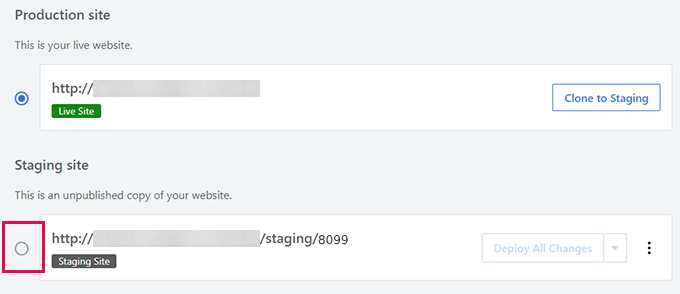
Simply select the radio button next to the Staging site, and Bluehost will switch to your staging website.
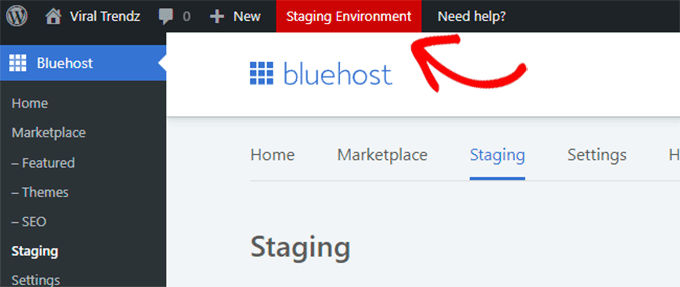
Once switched, a button will appear at the top of the screen signaling that you are operating on the staging website.

Creating a Staging Site on SiteGround
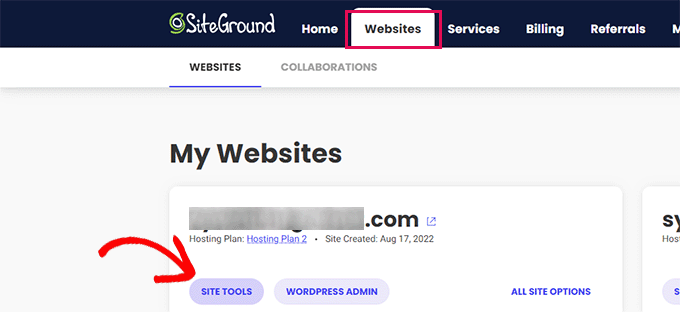
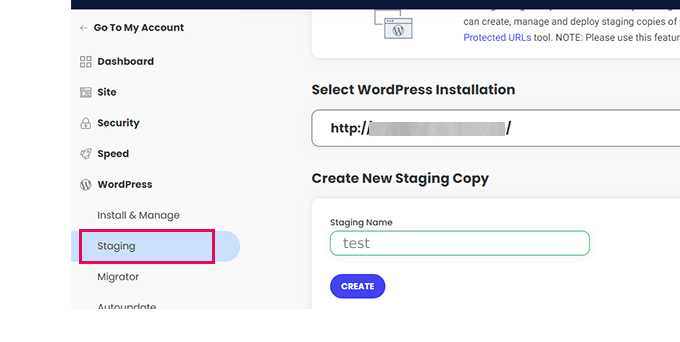
To proceed, click on the ‘Create’ button and Siteground will generate a staging replica of your website.
Following that, you are required to click on the ‘Go to protected URLs’ option to secure your staging website with a password and maintain its privacy.
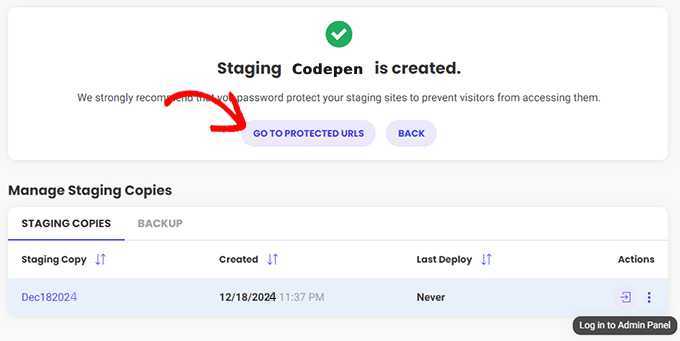
Siteground will automatically populate the URL and path for your staging website on the subsequent screen.
Enter your preferred username and password to safeguard your staging site.
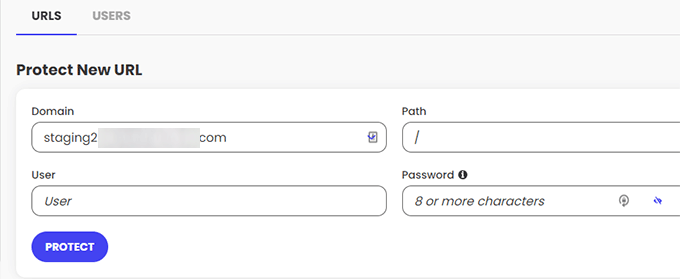
Press the Protect button to save your configurations.
You can then navigate back to the WordPress » Staging page and select the login to Admin Panel button beside your staging website.

SiteGround will open the WordPress admin area of your staging website, allowing you to carry out testing of your alterations on this staging website.
Transferring Changes Back to Your Live Website
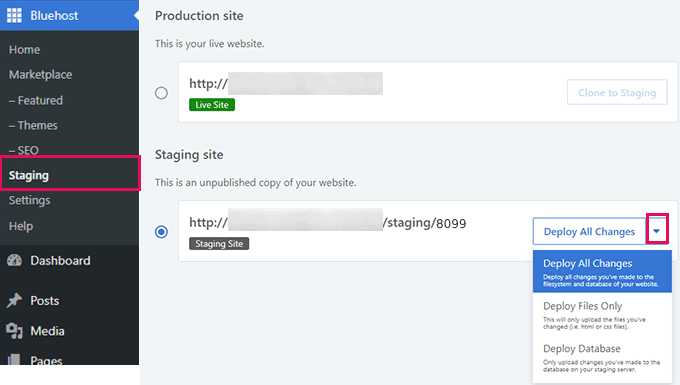
Once you have tested your changes on the staging website, you may wish to integrate them into your live website.
SiteGround simplifies this process.
Simply navigate to the WordPress » Staging menu from the left-hand side and select the three-dot menu next to your staging site under the ‘Manage Staging Copies’ section.

The menu will display two deployment options: ‘Full Deploy’ or ‘Custom Deploy’.
The ‘Full Deploy’ option merges all content from the staging website to your live website. The ‘Custom Deploy’ option enables you to choose specific files or data for merging.
If uncertain, choose the ‘Full Deploy’ option.
SiteGround will then transfer the staging site to your live website.
Creating a Staging Site on WP Engine
WP Engine is the best WordPress-managed hosting provider globally. Managed WordPress hosting offers comprehensive services including updates, backups, security, and performance.
WP Engine includes a one-click staging solution with its plans. If your website is hosted on WP Engine, here’s how you can establish a staging environment for it.
Initially, log in to your WP Engine dashboard. Proceed to the ‘Sites’ page and click on your website.
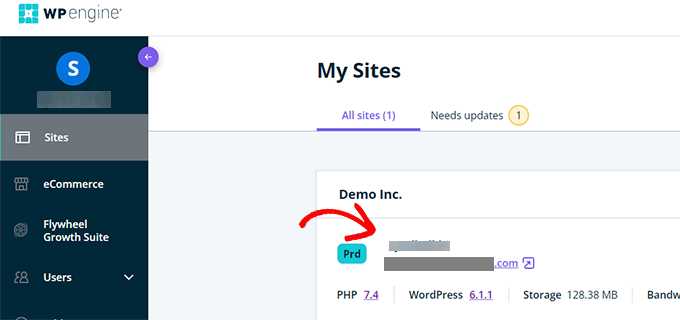
This will lead you to your website dashboard.
you should select the ‘Add Staging’ link from the left-hand column or choose it under your website name at the top.
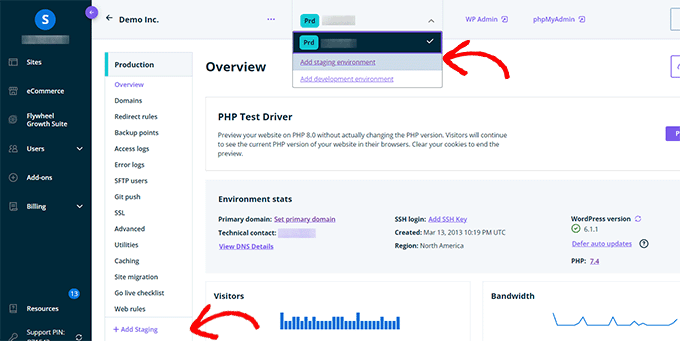
This action will take you to the ‘Add Environment’ screen.
You will be prompted to select how you would like to proceed with your staging environment.
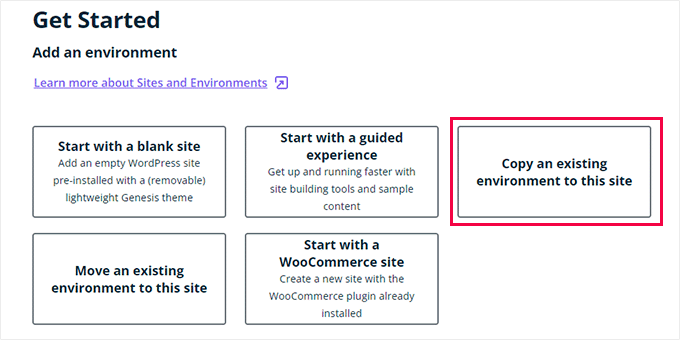
Here is the function of each of these choices:
- ‘Start with a new blank site’ generates an empty new site.
- ‘Start with a guided experience’ creates a new site with a guided experience and demo content.
- ‘Copy an existing environment to this site’ will duplicate your production or development environment to this site (e.g. replicate your live site to this environment).
- ‘Move an existing environment’ shifts an environment to this site (e.g. transfer the development environment to the Staging)
- ‘Start with a WooCommerce site’ makes a new WordPress site with WooCommerce pre-installed.
As you desire to form a staging copy of our live website, you will have to choose the ‘Copy an existing environment to this site’ option.
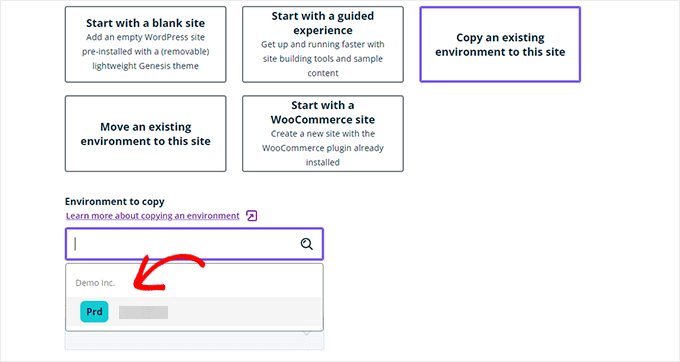
Upon selecting an environment, choose the most recent backup you wish to replicate, and then proceed by clicking the ‘Next’ button.
Now, you will be required to specify a name for your staging site. This name will be utilized in your staging site URL. Following that, select STG (staging) as your environment type.
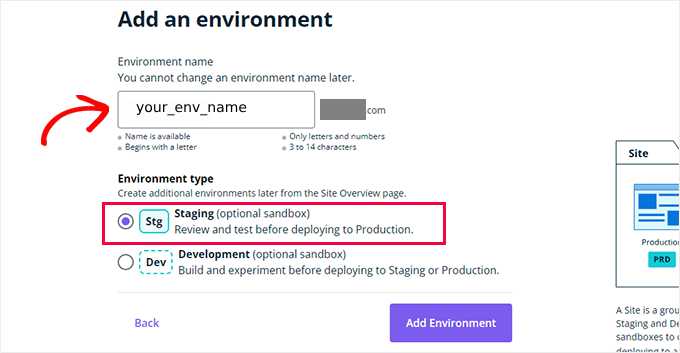
Click on the ‘Create Environment’ button to proceed.
WP Engine will now generate a staging site for you. Subsequently, you will be directed to your Staging environment dashboard.

Subsequently, you must hit the Padlock icon to activate password protection for your staging site.
Once completed, you need to switch to the ‘Utilities’ tab to copy your staging site username and password.
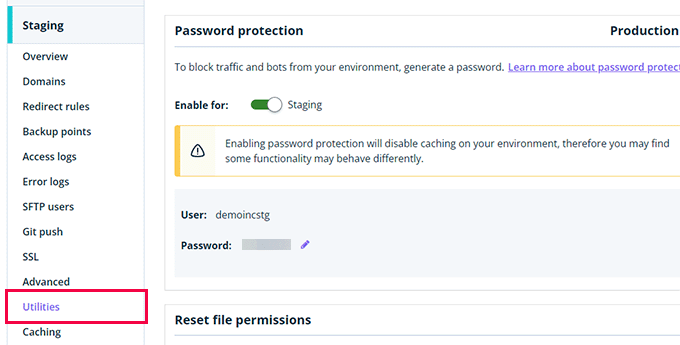
You can now press the ‘WP Admin’ button at the top to log into your staging website.
Feel free to make adjustments and experiment with features on the staging website, just as you would in a typical WordPress site that you install elsewhere.
Create a WordPress Staging Environment Using hPanel
Deploy Changes From Staging to Live Website on WP EngineAre you looking to integrate amendments you made on the staging website to your live website? To start the deployment, simply initiate the procedure by clicking on the ‘Copy Environment’ button. When you click on the ‘Copy Environment’ button, it will transport you to a page with various choices. Here, you’ll have to designate your source and target environments for the transfer. Here, you have the option to select your staging website as the source environment and your production or live website as the destination environment. You have the flexibility to decide what you wish to transfer. For example, you can choose to transfer all database tables and files, specific files and database tables, or solely the file system.
Note: If you decide to transfer everything, it is important to note that any data housed on your live website after the use of the staging environment will be lost. This could include crucial data such as new posts, pages, customers, and orders. Hence, before deployment from staging, we recommend executing a backup of your live site. (Free and Easy)
Following the selection process, click on the ‘Review and Confirm’ button to initiate the transfer. This might take some time to move all the content to your live website.
Upon completion of the process, you will receive an email notification.
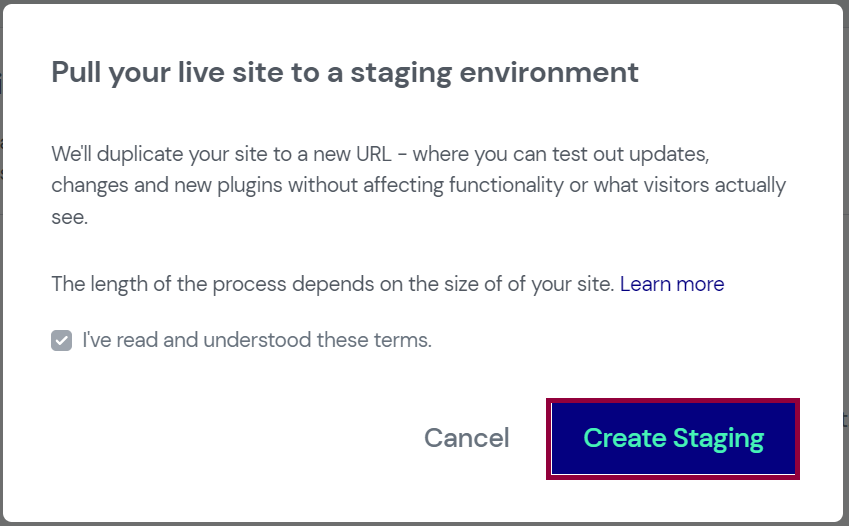
A convenient method for establishing a staging site is by utilizing a specialized tool. With hPanel, you can swiftly set up a staging environment within minutes with just a few clicks.
Create a Staging Site on Hostinger hPanel
To create a staging environment on Hostinger’s hPanel, adhere to the following steps:
- Access hPanel, and proceed to WordPress → Staging.
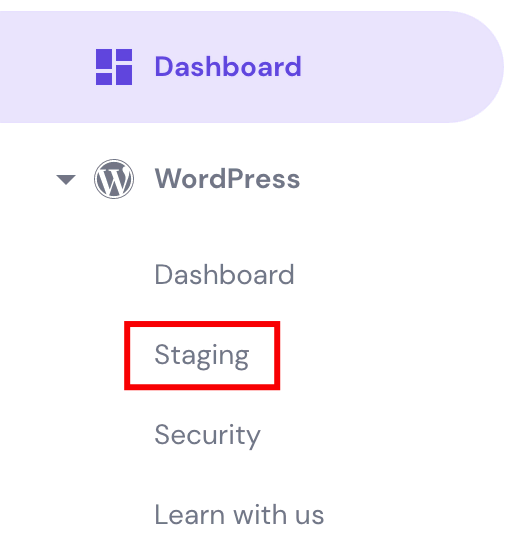
- Simply press the Development tab, and then select the Make Development option.
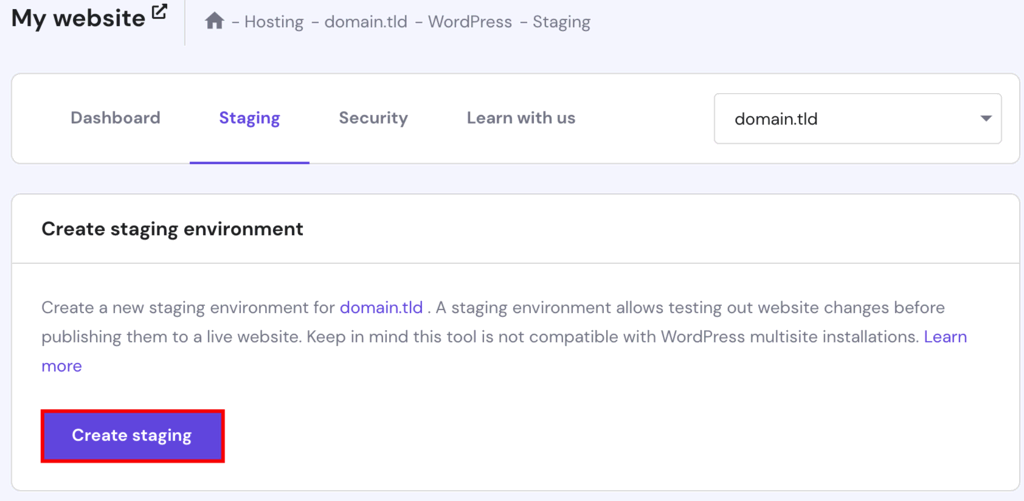
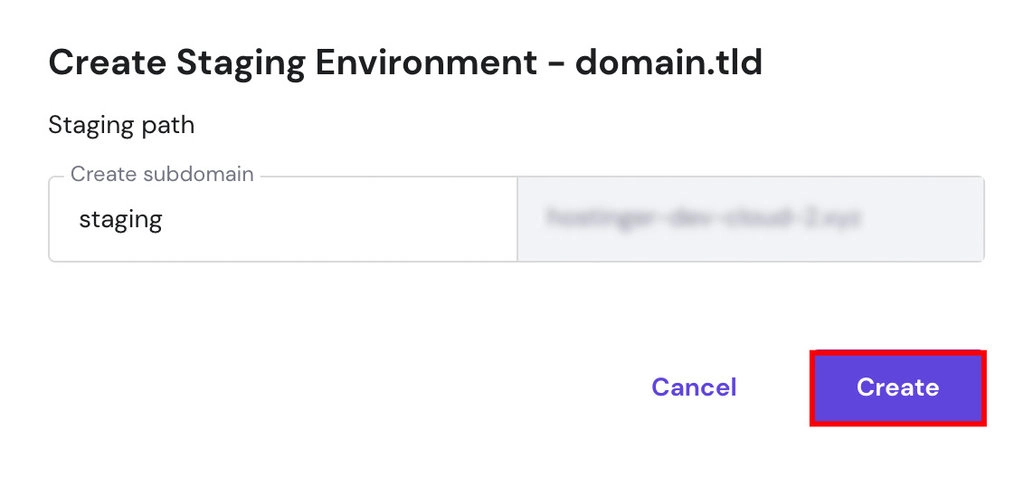
- Input the desired subdomain name into the provided field for the staging website, and then press Generate.
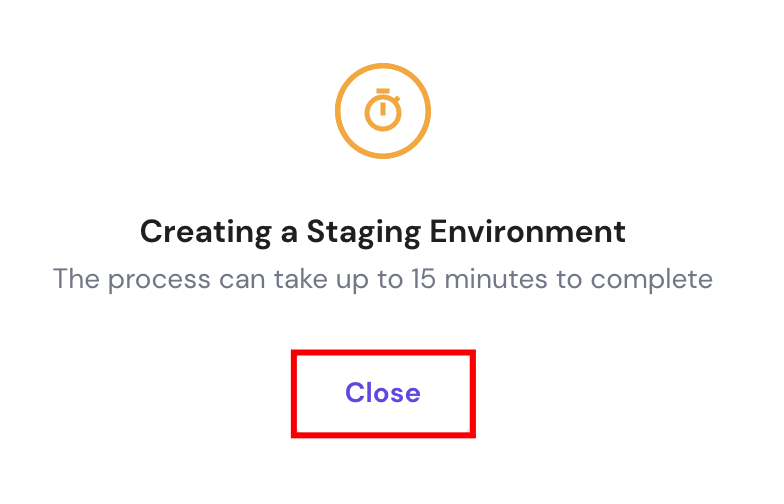
- It may take up to 15 minutes to create the staging website, depending on the size of the production website. Click the option to close the confirmation message:
Control the Staging Site
The staging site will emerge in the hPanel list shortly. Then, go through these procedures:
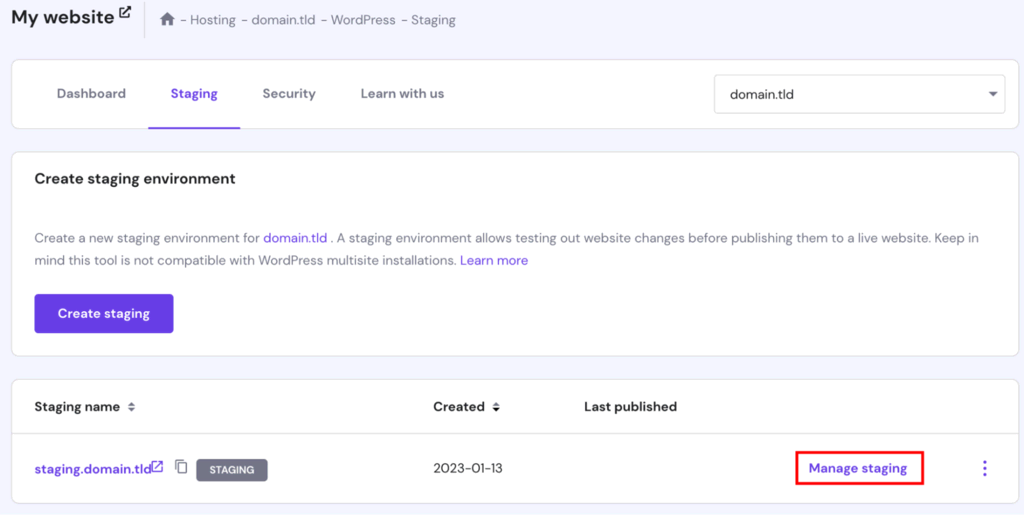
- Upon reaching the staging page in hPanel, choose the Control staging button next to your desired website.
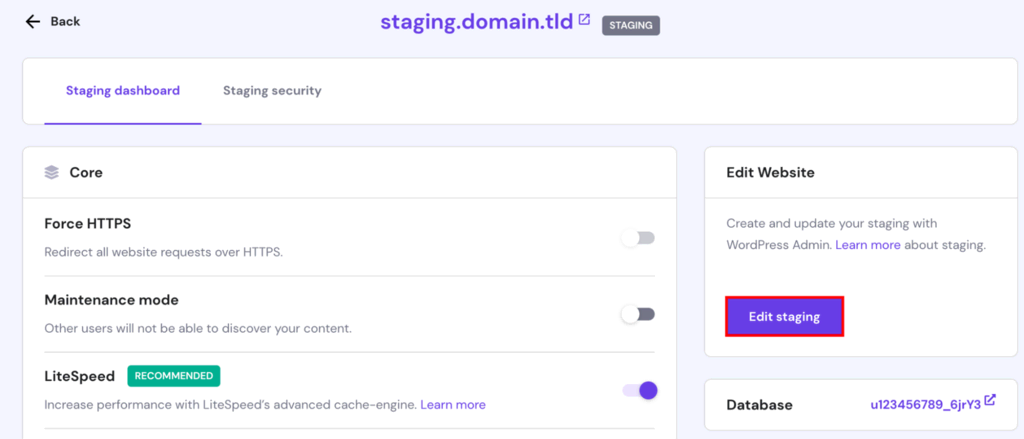
- You will be taken to the staging dashboard. Click the Edit staging button to enter the WordPress admin area and initiate modifications.
- To get all the changes live on the website after finishing, consult the next section.
Release the Website
The conclusive and paramount action is to move all the modifications from the experimental website to the active one.
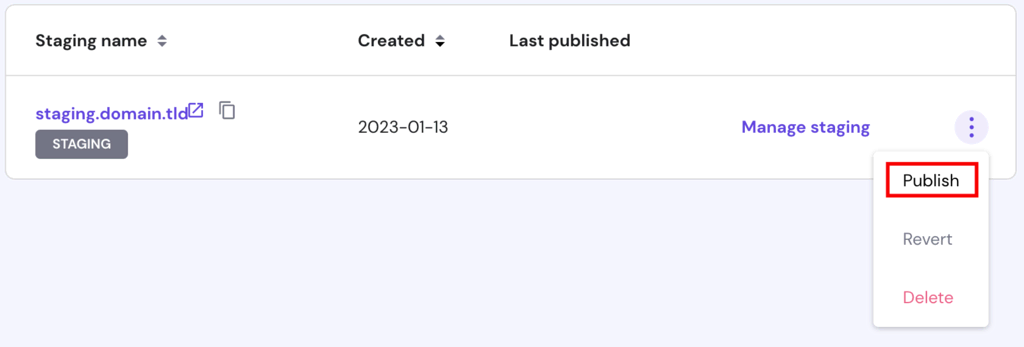
- Check the list of the test websites. Select the three-dot symbol adjacent to the test website and hit Publish.
- Peruse the disclaimer and press the Publish key to authorize. Allow approximately 15 minutes for the procedure to conclude.
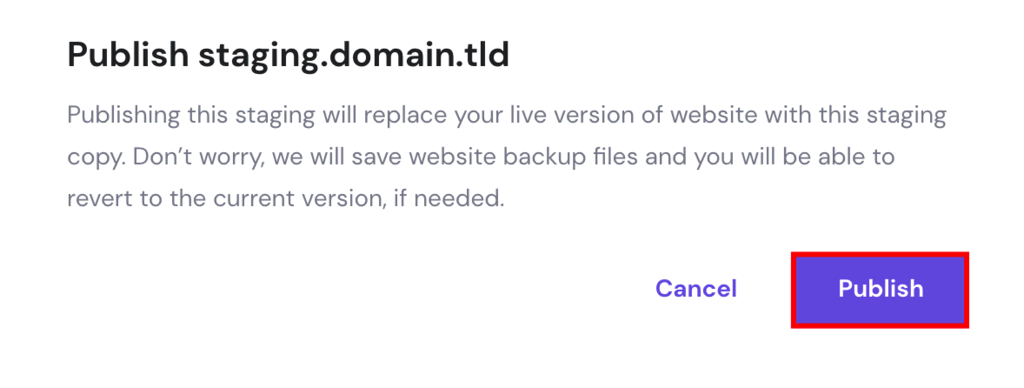
- Hostinger’sThe WordPress development tool will also immediately generate a backup of the current version of the live website. This will enable you to undo all the modifications if necessary.

The staging site is now live.
How to Create a WordPress Staging Site Manually
If your web hosting provider does not provide a staging site feature, you can manually create one. While this approach demands technical expertise and more time, it provides complete authority over the staging site setup process.
Create a Subdomain
Before beginning, we suggest setting up a subdomain for the staging site. This method enhances the safety of implementing changes in the staging site as it is isolated from the production website.
For instance, if the production environment is domain.tld, then utilize staging.domain.tld as the subdomain URL for the staging environment. Note that it also entails the creation of a separate database for your subdomain.
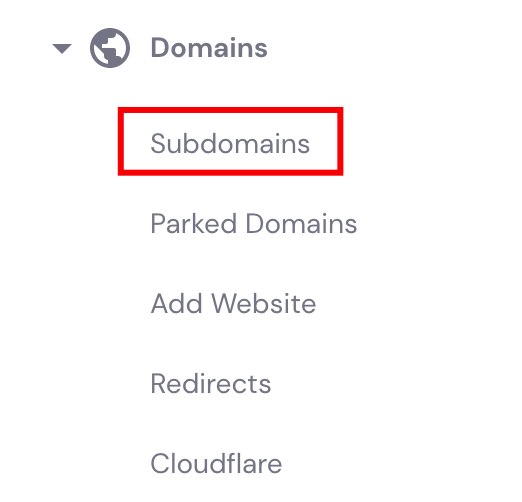
1. Start by opening hPanel and navigating to the Domains → Subdomains section.
2. Enter the subdomain name and click Create. Doing so will automatically create a new folder in the home /public_html directory.
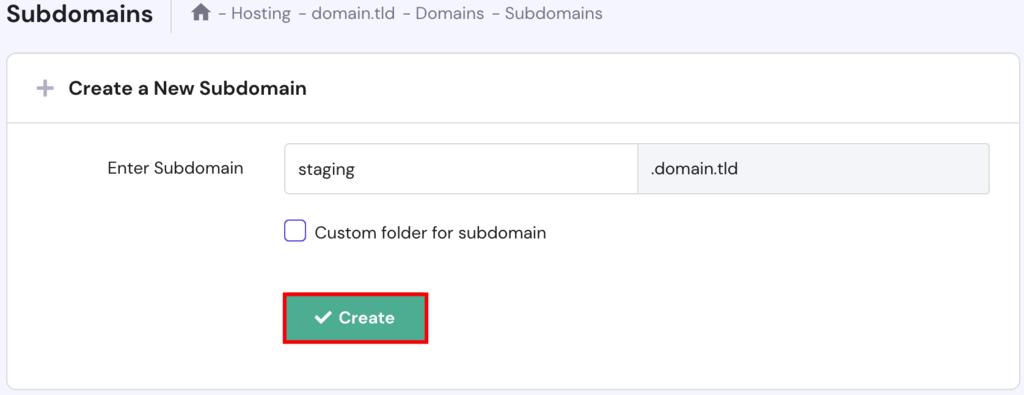
3. If you want to use a custom name for the folder, tick the Custom folder for subdomain option, specify the custom name, and click Create.

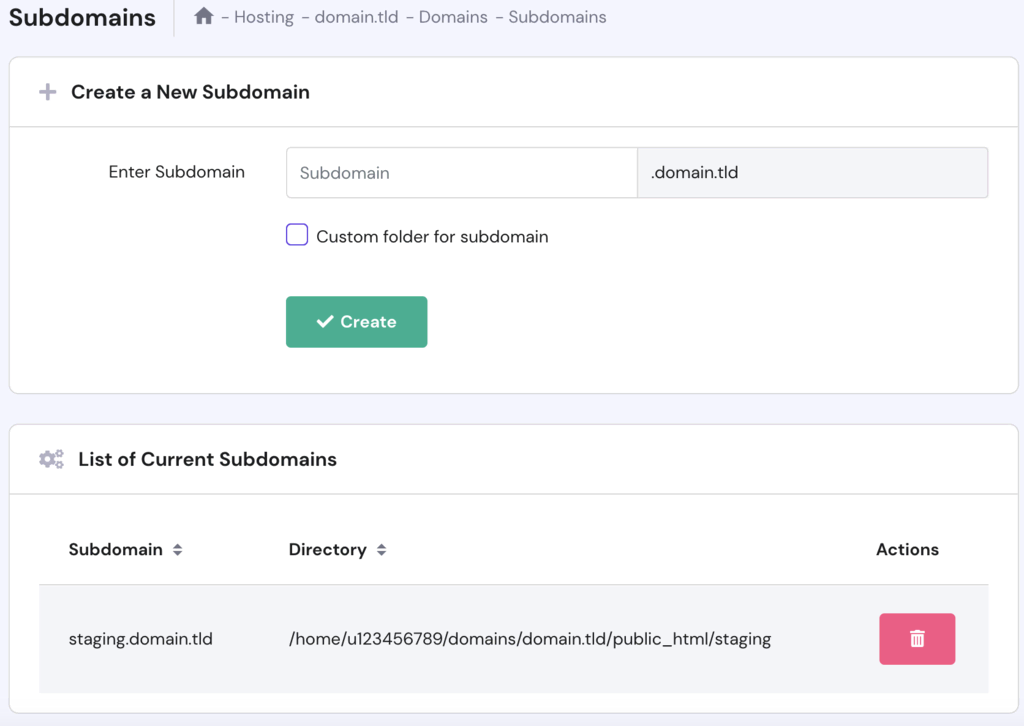
4. You’ll see the subdomain in the List of Current Subdomains section.
Copy Your WordPress Website Files to the New Subdomain
To proceed, reproduce all your WordPress site’s files to the fresh subdomain.
To achieve this, utilize either File Manager or a FTP client. The steps are analogous on both platforms. In this tutorial, we will duplicate the live site files using File Manager.
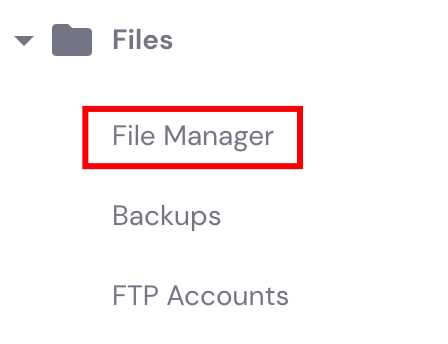
1. Unlock hPanel and navigate to Files → File Manager.
2. Locate the public_html folder of your website.
3. Then, clone the files to /public_html/staging/. Choose all the directories and files except the staging folder and hit the Copy icon on the top toolbar.
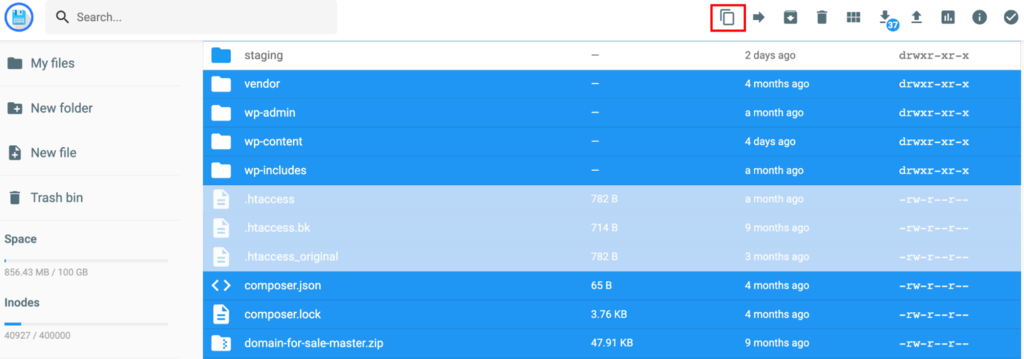
4. Select the staging folder and press Copy.
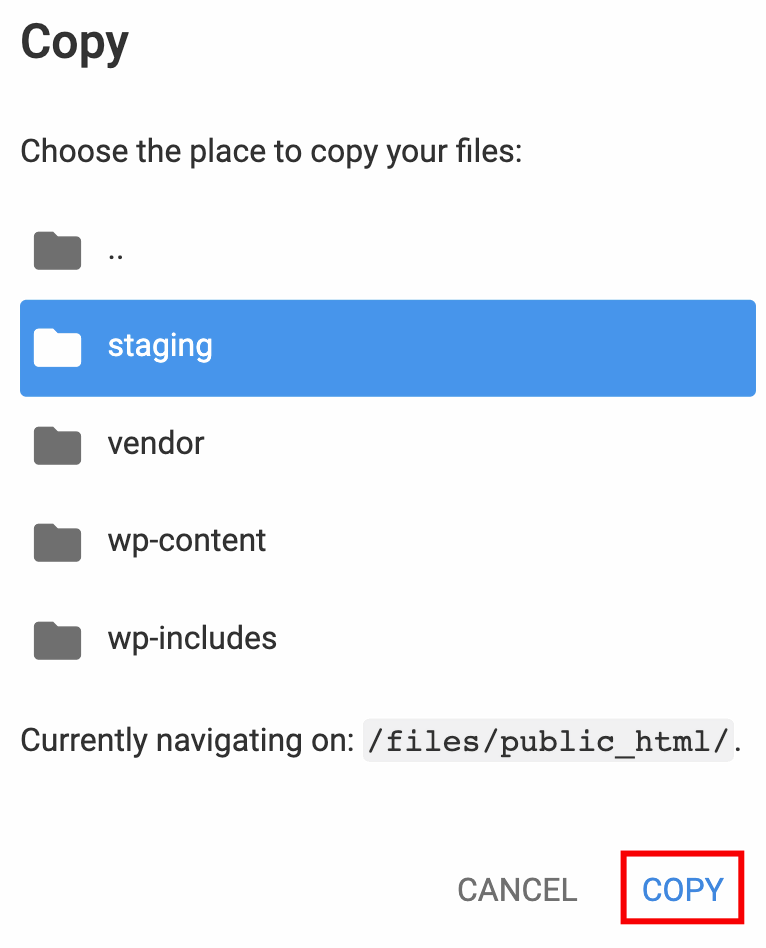
5. After the copying process is complete, you will be automatically redirected to the staging folder.
Duplicate the Database
The following step involves replicating the production site’s current database. Here’s what to do:
1. Go to the WordPress → Dashboard section and identify the database being used by your main website.
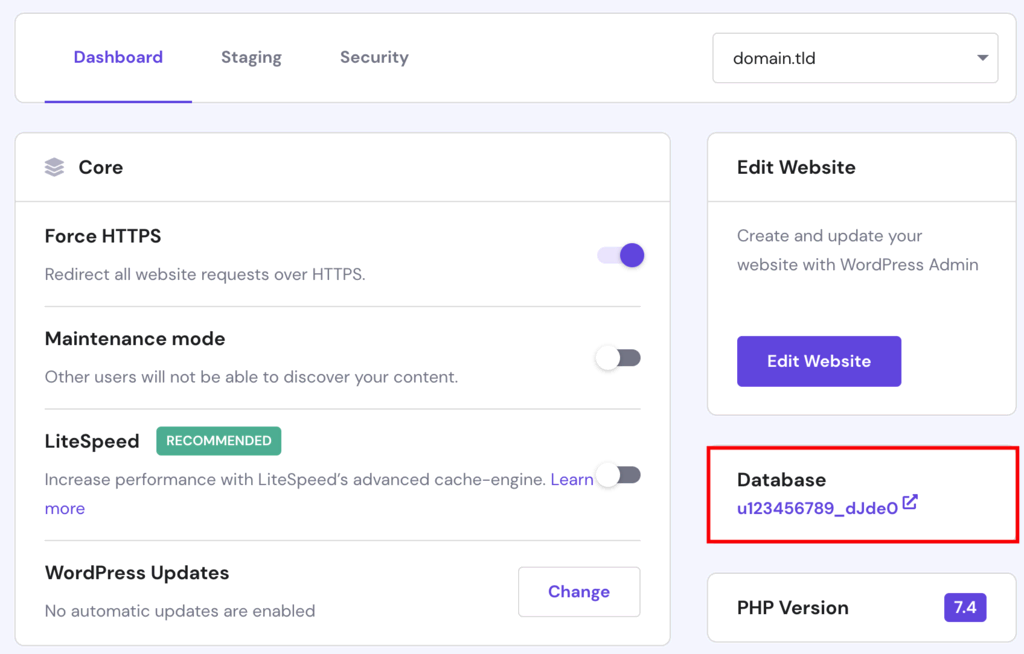
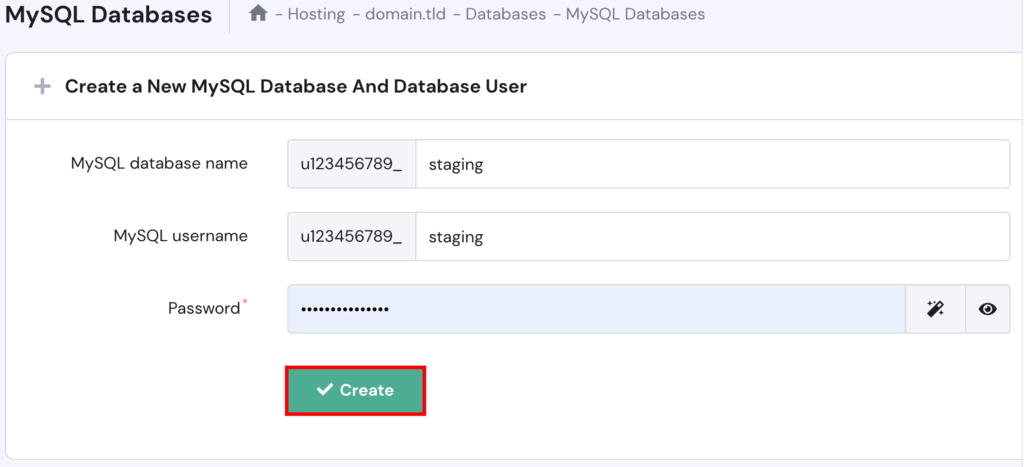
2. Then, proceed to the Databases → MySQL Databases section and establish a new database for the staging website.
3. Subsequently, access the Databases → phpMyAdmin section, locate the live website’s database, and select Enter phpMyAdmin.

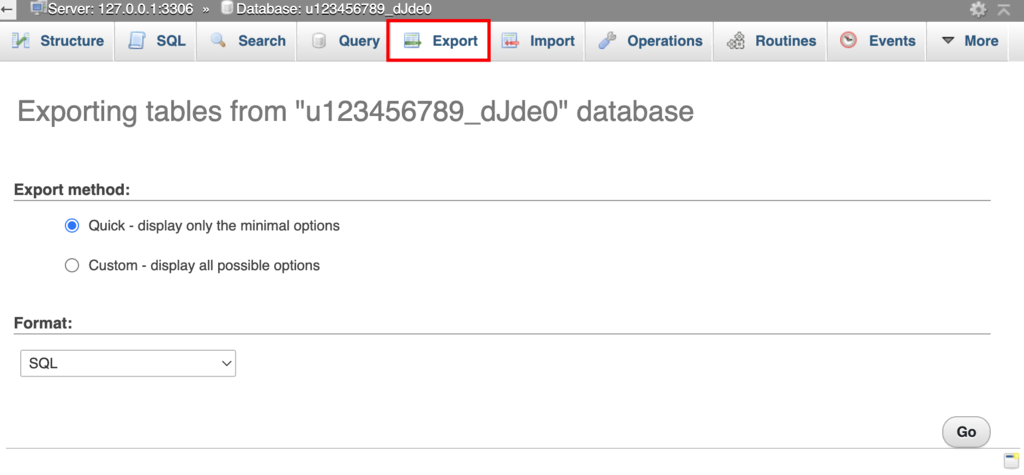
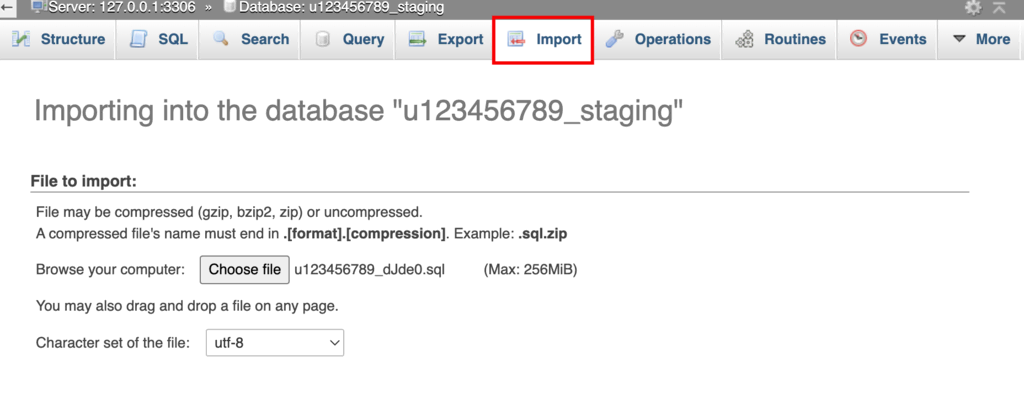
4. Click on the Export option from within the phpMyAdmin section, then proceed by selecting the Go action to retrieve the SQL file.
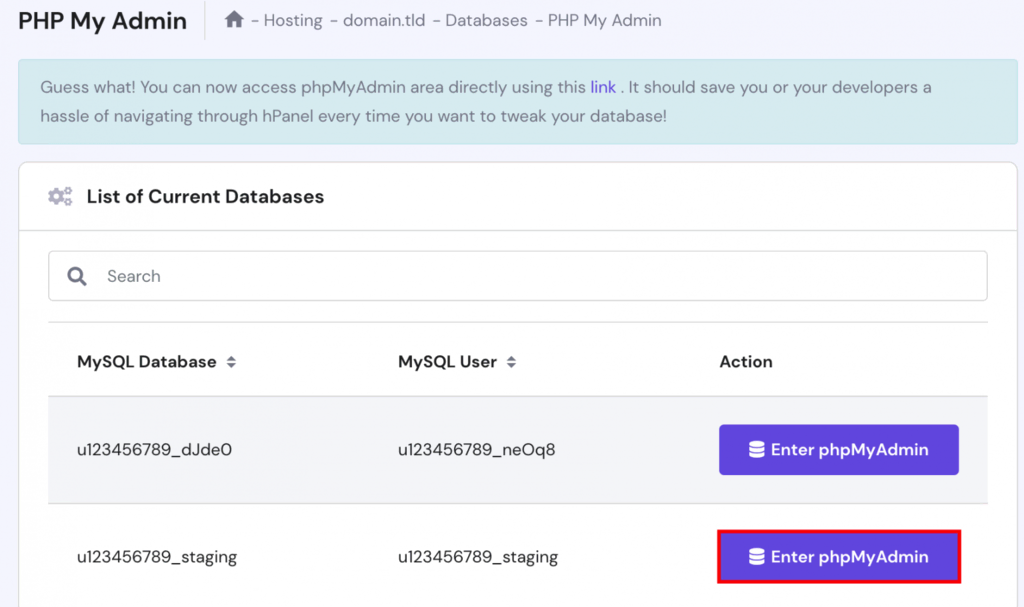
5. Navigate back to the Databases and phpMyAdmin section, then proceed to select and click the Enter phpMyAdmin button for your staging database.
6. While still in the phpMyAdmin interface, choose the Import function, choose the previously obtained SQL file, and then proceed with the action by clicking Go to complete the database import.
Wait for a couple of minutes, and all database tables will be displayed on phpMyAdmin.
Set up the Subdomain’s wp-config.php File
1. Under File Manager, access public_html → staging → wp-config.php.
2. Scroll through until you locate a line of code that reads Database settings – You can get this info from your web host. Then, insert the following code:
define('WP_HOME','http://staging.domain.tld');
define('WP_SITEURL','http://staging.domain.tld');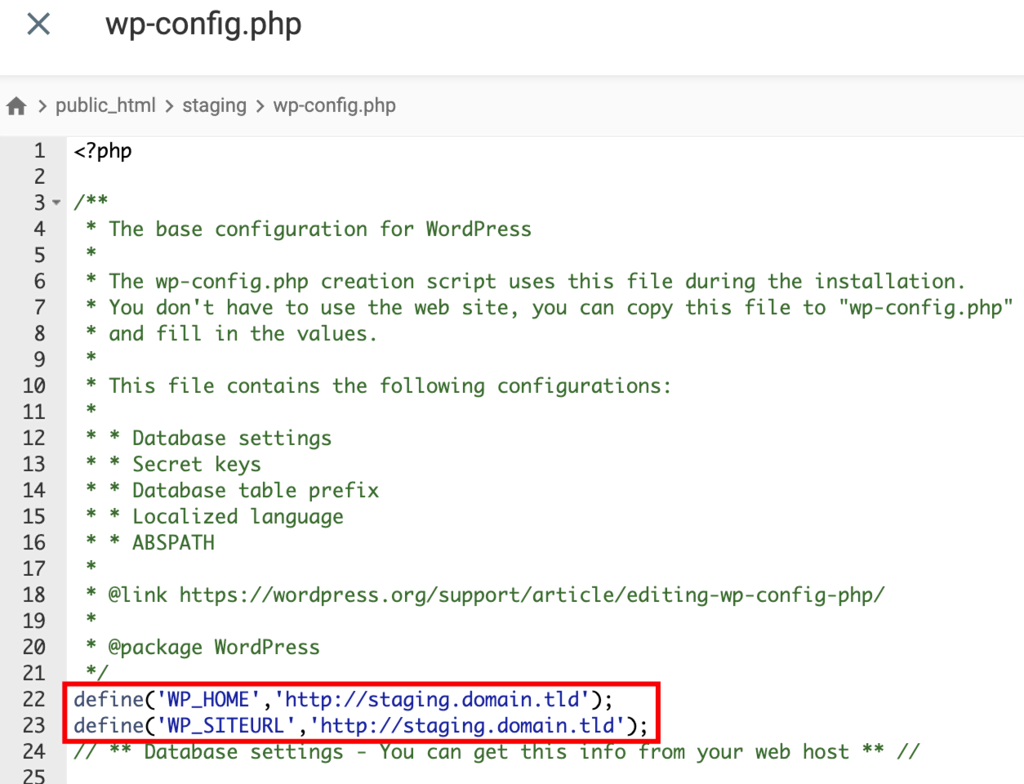
Ensure to modify the staging. domain.tld portion to match your staging subdomain.
3. In the wp-config.php window, scroll down and locate the DB_NAME, DB_USER, and DB_PASSWORD lines. Then, replace the database name, username, and password to correspond with your staging site’s database information. Once finished, save the adjustments.
The staging setup is now complete.
Deploy the Changes
To implement the modifications to the live setup, take the following steps:
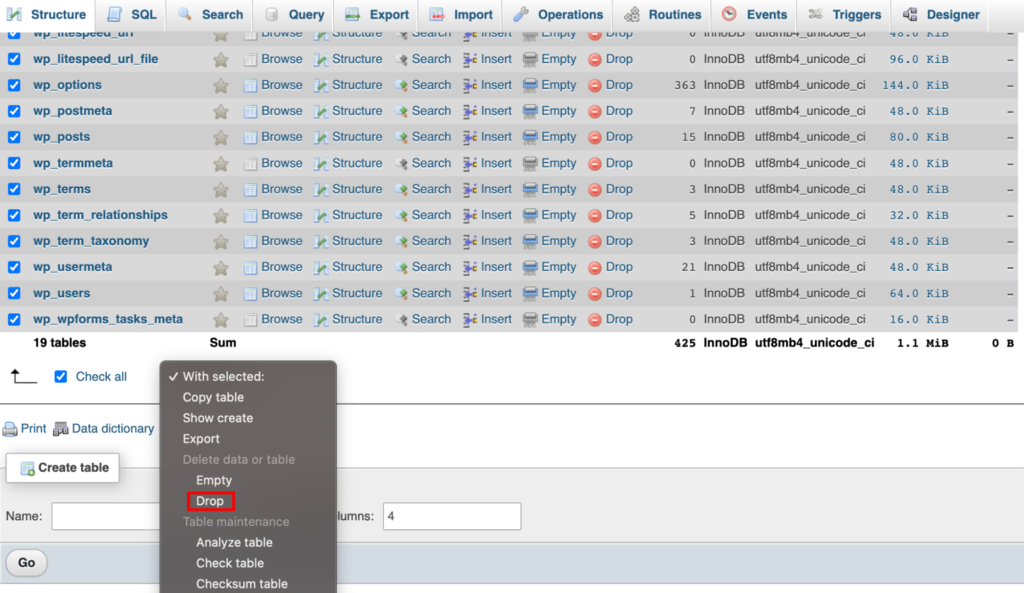
1. Export the staging website’s database and import it to the live database via phpMyAdmin. Note that it is only possible to import to an empty database. Therefore you will need to clear the live database, as demonstrated in the example below.
2. Access the File Manager and go to the public_html → staging directory. Select all files except for wp-config.php, and copy them to the live website.
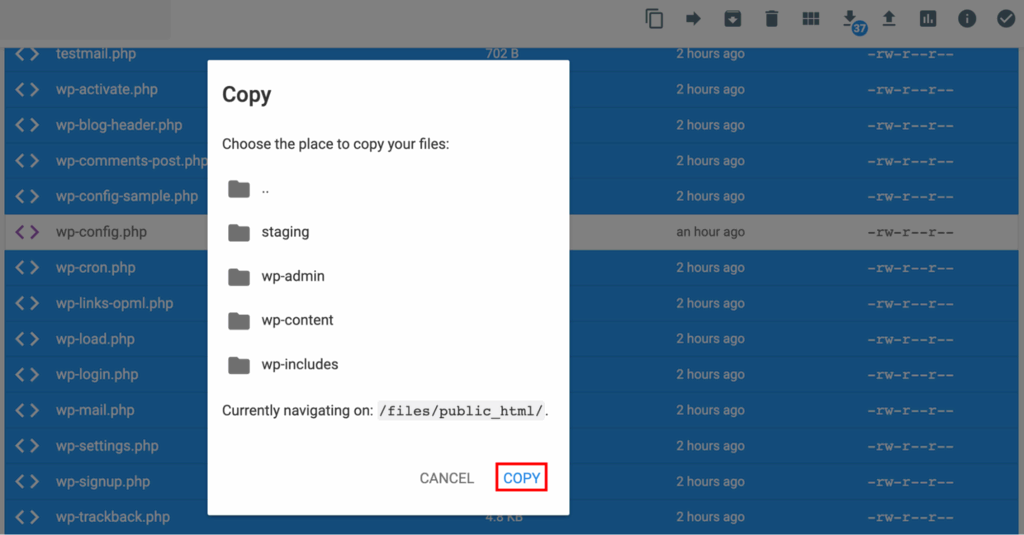
3. Finally, choose Replace.
Upon completion of the copy process, you will be automatically redirected to the live directory.
How to Set up a WordPress Staging Site Using the WP Staging Plugin
If you are searching for a simpler method to establish a staging website, consider utilizing a WordPress add-on. WP Staging is one of the most popular WordPress plugins for configuring a staging site. It also functions as a WordPress backup plugin – a feature that complements the staging procedure.
Proceed with the following steps to generate a WordPress staging site utilizing the WP Staging plugin.
Develop a Fresh Staging Site in a Subdirectory
Employing a subdirectory stands as the simplest and quickest method for crafting a staging site using WP Staging. This selection automatically applies to the free and premium versions of the plugin. Nevertheless, if your preference leans toward setting up a staging site in a subdomain, lean towards the premium plugin version.
Once you have installed the WordPress plugin, adhere to the guidelines below:
- Within the WordPress admin sidebar, access the WP Staging section and click the CREATE NEW STAGING SITE option.

- Input the desired name for your staging site in the Enter Site Name (Optional) field. In this instance, the staging site URL will appear as https://domain.tld/staging.

Note that the functionalities of Advanced Settings are solely accessible to users of WP Staging Pro. These functionalities introduce additional features, such as establishing a replicated site and preserving it in a customized destination directory.
Select Which Database Tables to Include and Exclude
On certain occasions, it proves advantageous to exclude specific database tables or files in order to expedite the replication process. This stems from the fact that certain plugins have the potential to generate substantial content. Make the requisite adjustments within the Database Tables and Files segments of the WP Staging plugin.
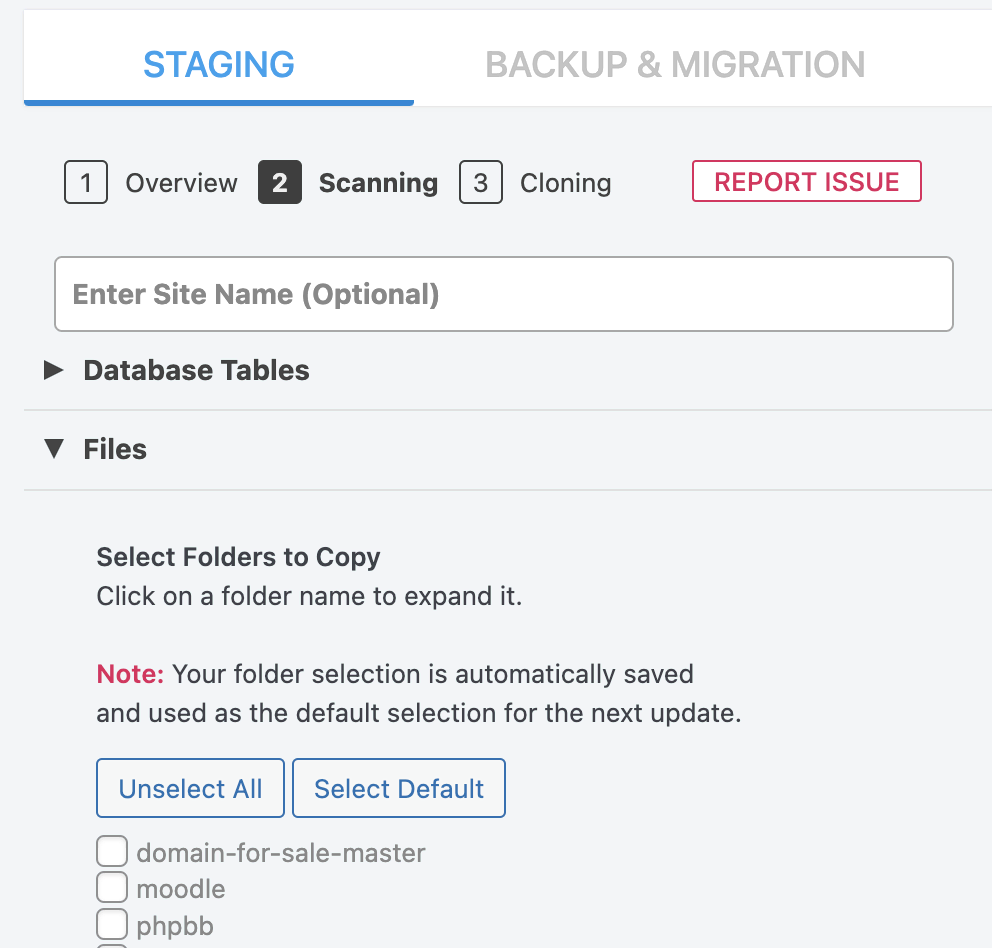
If you’re not certain about any of the settings, we advise keeping the default options active.
Start the Cloning Process
After adjusting the Database Tables and Files, press the Start Cloning button. The duration of this process might vary depending on the size of the website. At this point, you should be presented with the staging site’s URL. Click the Open Staging Site button to access it.
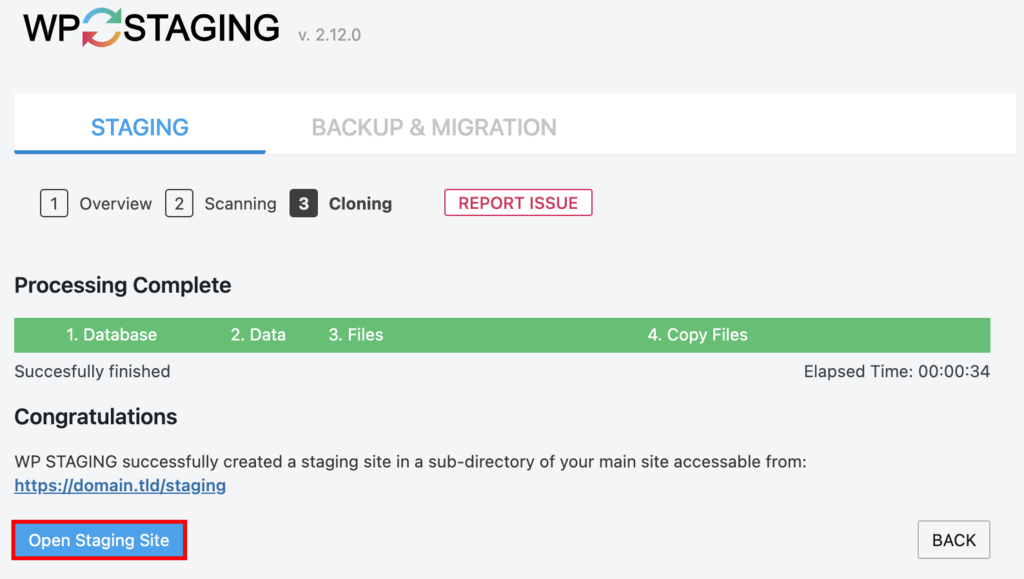
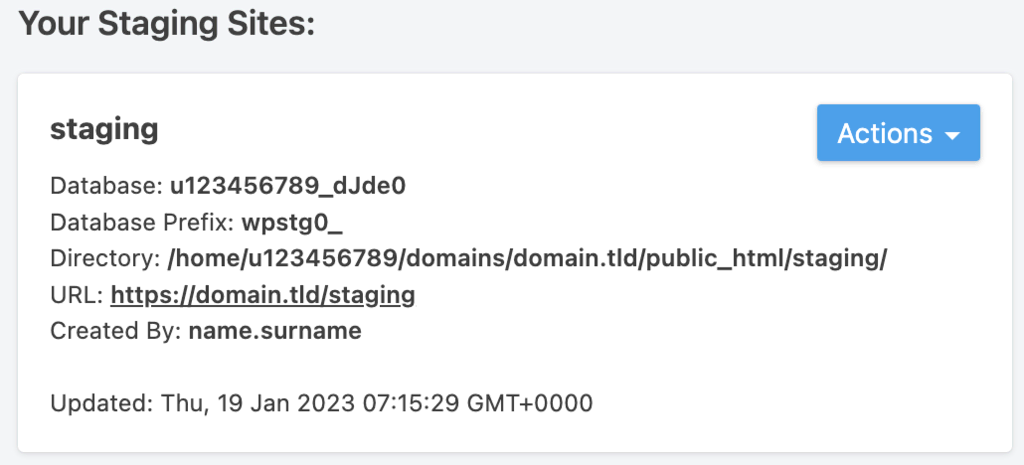
Another method to access the staging site is by navigating to the WP Staging → Staging Sites section within the WordPress dashboard. There, you will find the list of the current staging sites.
Conclusion
In conclusion, establishing a WordPress staging site is crucial for safe testing and updates. Whether utilizing hosting providers like Bluehost or SiteGround with one-click staging, or opting for manual methods and plugins like WP Staging, each approach offers a secure environment to test changes before implementing them on the live site. Choose the method that suits your preference and hosting plan to streamline the process of creating, testing, and deploying changes seamlessly. With a staging site, you can confidently enhance your WordPress website without the risk of disrupting the live user experience. Stay proactive in website management by adopting a staging strategy that aligns with your hosting capabilities and preferences.


1 comment
[…] 11 WordPress Mobile Plugin for Optimal Usage in 202… Top 5 hosting to WordPress Staging Site with plugins in… Step-by-step Guide: Crafting a Product Catalog in […]